
You open a wallet, hold some USDC, and see a bright APY card that makes the whole thing look simple. It's tempting to assume the first move is to click deposit and let the yield start, but that's exactly how beginners end up learning the hard way. How to learn DeFi starts much earlier than the first yield screen, with small transactions, clear controls, and a habit of checking what can go wrong before you sign anything.
The safest path is not a tour of every protocol category. It's a risk-first routine that teaches you how wallets work, how transactions behave, where fees show up, and how to decide whether a yield is real or just loud. DeFi can be large, cyclical, and unforgiving, and the market itself has shown that clearly, with TVL rising and falling across different years and cycles, including the broad swings noted in CoinGecko's DeFi survey and market overviews such as the 2021 peak and later retracement periods described in the sources below (CoinGecko's DeFi survey, Resh Network's DeFi state of market 2026 overview).
Start With a Risk-First DeFi Roadmap
A good first lab is small and reversible. Bridge a tiny amount, confirm the balance, make one swap, then supply and withdraw a little capital. Those steps teach the order of operations before any real yield decision enters the picture, which is the safer way to build judgment in a market that has already moved through sharp growth and retracements, as reflected in CoinGecko's DeFi survey and Resh Network's 2026 market overview.
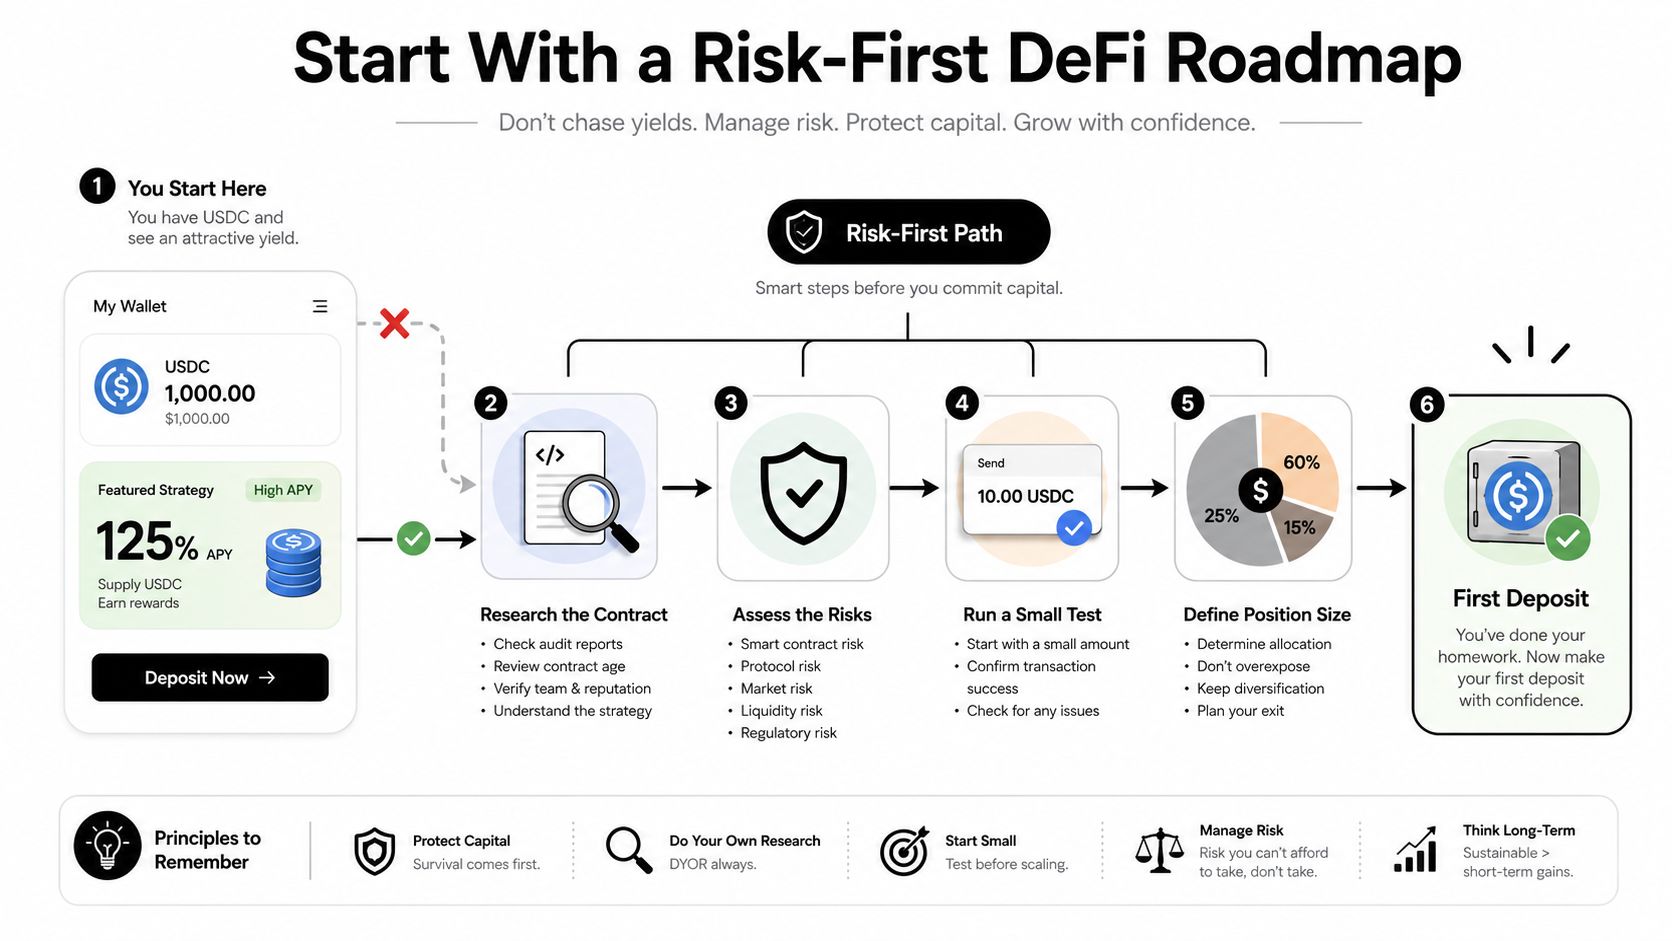
The first mistake many beginners make is treating the highest APY as the starting point. A better starting point is to learn the mechanics with tiny, reversible actions, because DeFi rewards people who understand what they're signing, not people who move fastest.
Learn the sequence before you chase yield
A practical roadmap starts with wallet basics, then moves into simple on-chain actions, then into yield evaluation. That progression lines up with the beginner learning path described in structured DeFi guides, which cover blockchain basics, non-custodial wallet security, AMMs, lending, stablecoin mechanics, and impermanent loss before real practice on low-fee chains like Base, Arbitrum, or Optimism (UseLearnAI's beginner guide).
Practical rule: every first transaction should have a purpose, a small capital limit, an expected result, and a clear exit path.
If you want a simple way to think about your first month, use labs instead of goals. One lab can be “bridge a tiny amount and confirm the balance.” Another can be “make one swap and inspect it in an explorer.” A third can be “supply a small amount and then withdraw it.” That kind of repetition builds judgment faster than reading protocol threads, because you're training your hands, not just your attention.
Use a dedicated learning wallet
A separate learning wallet reduces the cost of mistakes and keeps your main funds isolated. Create it for practice, protect the recovery phrase, and treat every signature as final until you verify the request on-screen. If a request looks unfamiliar, don't approve it just because the interface looks polished.
For a beginner, the right benchmark is simple, use testnet practice where possible, keep a dedicated wallet for learning, and move only tiny amounts to a low-cost chain when you're ready. That way, the wallet, explorer, and dashboard workflow becomes muscle memory before any meaningful capital is at risk.
If you want a second pass on size, approval, and exit discipline before your first live transaction, this risk management guide for DeFi beginners is a useful companion.
Build a Secure Wallet Foundation
A DeFi wallet is not a login, it's direct control over assets on-chain. That means the learner needs to understand the public address, the private key, the seed phrase, and the network they're using before they touch a protocol. If those words still blur together, stop and separate them before you deposit anything.
Set up the basics the right way
Create a fresh non-custodial wallet, write down the recovery phrase offline, and store it somewhere no one else can reach. Then verify the network you're on, because the same wallet can interact with different chains, and confusing one network for another is an easy way to misread a balance or send funds to the wrong place.
When the wallet is ready, receive a tiny test amount and inspect it in a block explorer. Check the recipient address, the token amount, the network, the estimated gas fee, and whether the request is an approval or the actual transaction. Those details matter more than a protocol's marketing claim, because the wallet screen is where the action happens.
Always read the approval screen like it's the last chance to stop a bad decision, because for many beginners, it is.
Know what you're signing
DeFi often asks for more than one signature. A wallet may require an approval transaction before the main swap, deposit, or supply action, and that second step changes both the number of clicks and the total gas cost. If you don't notice that sequence, you can think a transaction failed when it just needs another confirmation.
A hardware wallet can help reduce exposure for larger balances or more frequent use, but the right setup depends on your device and your threat model. If you're thinking about that route, this hardware wallet guide gives a practical next layer without skipping the basics.
Pre-Transaction Wallet Check | What to Confirm |
|---|---|
Wallet ownership | You control the recovery phrase and never shared it |
Network | The active chain matches the action you want to take |
Recipient address | The destination is correct and fully visible |
Token amount | The amount matches your intended test size |
Approval screen | You know whether it's approval, swap, deposit, or withdraw |
Gas estimate | The fee is acceptable for the size of the test |
Explorer record | The transaction shows up on the right chain |
Understand the DeFi Building Blocks
A lot of beginners try to memorize protocol names before they understand what money is doing. That usually backfires. If you can follow one USDC example from wallet to swap to lending, the rest of the ecosystem becomes easier to read.
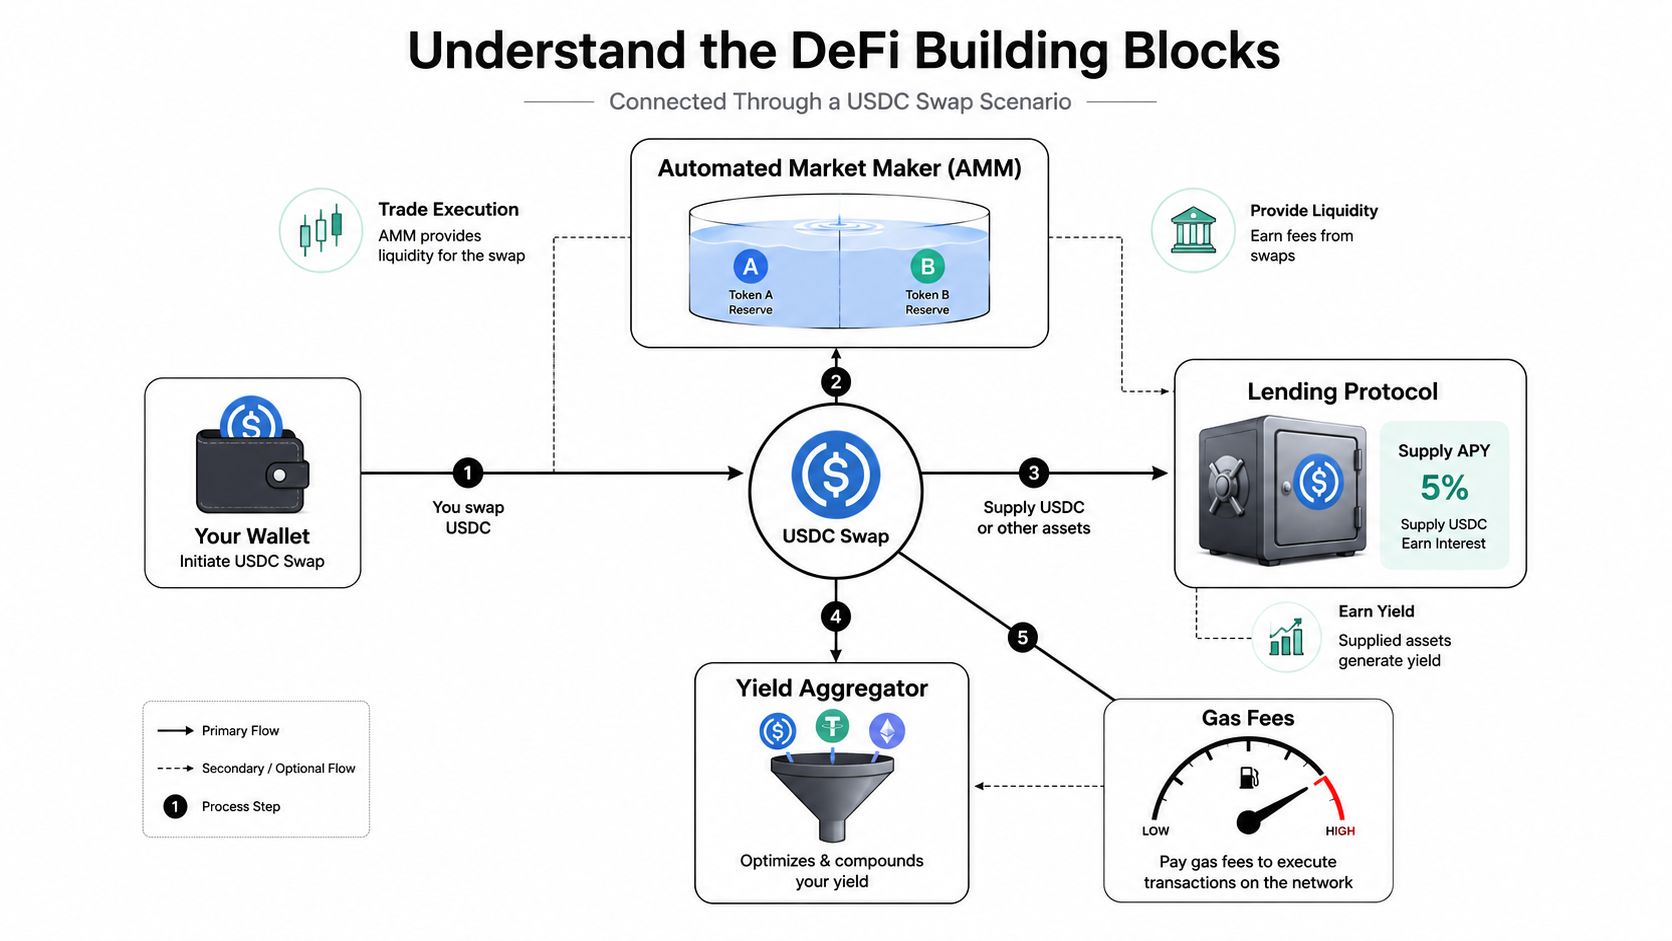
Follow one USDC path
Start with a wallet holding USDC. If you swap USDC on a DEX, the trade usually runs through an automated market maker, or AMM, which uses liquidity reserves instead of a traditional order book. The pool sets the exchange path, and the trade changes the pool's balance as it executes.
If you supply USDC to a lending protocol, borrowers may use that liquidity, and you earn a return because your funds are helping the market function. If you instead join a liquidity pool, your capital supports trading activity and you may collect fees or incentives in return. The payment is never free money, it's compensation for taking a risk, whether that's smart-contract exposure, liquidity risk, or a more specific protocol design tradeoff.
This overview of how DeFi works is helpful if you want a broader map of the moving parts after the first transaction feels less mysterious.
Stablecoins do not erase risk
A stablecoin can reduce token price volatility, but it doesn't remove every other kind of risk. The protocol can still fail, a contract can still have a bug, liquidity can still be thin, and a lending position can still get liquidated if the rules change around it. That's why stablecoin yield is still a risk decision, not a savings account substitute.
Impermanent loss is easiest to understand through comparison. If you put two assets into a pool and one runs far ahead while you were away, your pool position can underperform holding those assets. You didn't do anything wrong, you just accepted the pool's tradeoff.
Watch the source of yield, not just the headline APY. APY tells you what the screen says today. It doesn't tell you whether the return comes from borrowers, incentives, emissions, or something temporary.
Separate APY from realized return
APY is a display, realized return is the result after fees, timing, and market movement. That difference matters because a position can look strong on paper and still feel weak after slippage, gas, or an exit into a different pool depth. If you can explain where the yield comes from, you're already ahead of most beginners.
DeFi building block | Plain-English job |
|---|---|
Wallet | Holds your keys and signs transactions |
AMM | Handles swaps through pooled liquidity |
Lending protocol | Lets users supply assets and borrow against them |
Yield aggregator | Routes capital across options, often with extra logic |
Gas fees | Pays for network execution |
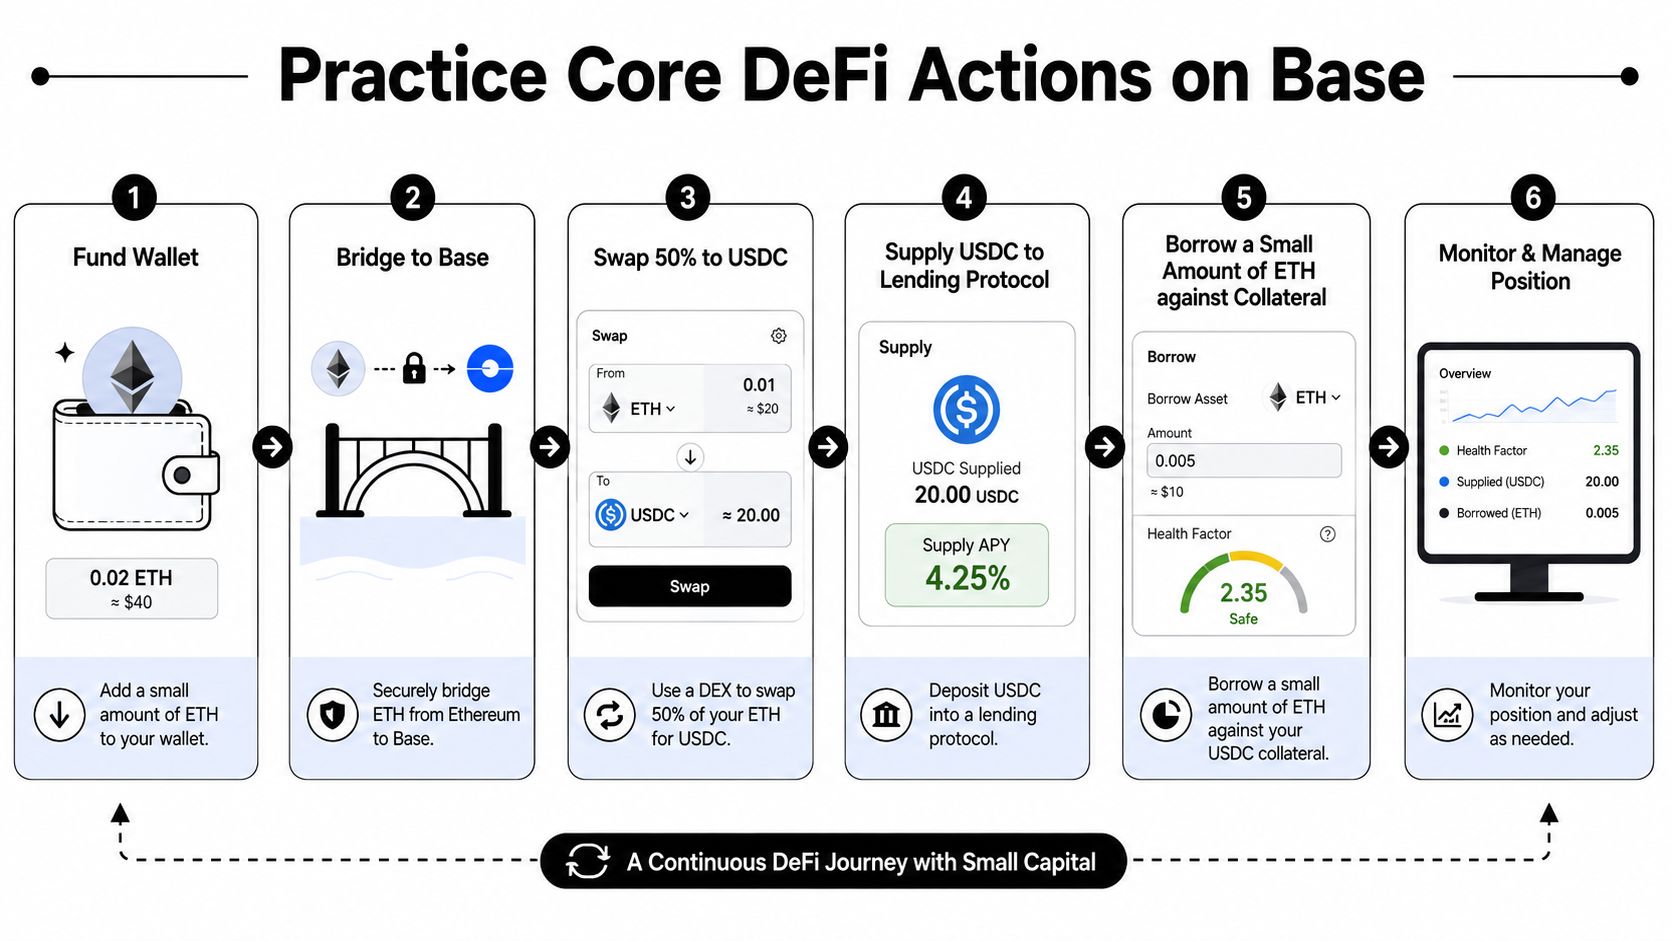
Practice Core DeFi Actions on Base
A careful beginner doesn't need to jump into everything at once. One small workflow on a low-cost chain teaches more than a dozen theoretical articles, because you see each approval, each confirmation, and each withdrawal for yourself.
Start with the smallest usable amount
Use a dedicated learning wallet, bridge a deliberately small amount of USDC or ETH to Base, and confirm the balance in the wallet before doing anything else. The point isn't to maximize return, it's to make mistakes cheap while you learn how the interface responds. Base is useful here because lower costs make early errors less painful.
A beginner's first live loop can be simple. Bridge in, make one stablecoin swap, inspect the transaction in an explorer, then withdraw or reverse the position. If you can't explain each step afterward, the trade was too large or too rushed.
Follow the branch that matches your goal
From there, pick one branch at a time. You can supply a tiny amount of USDC to a lending interface to see how a supply transaction works. You can test a liquidity position if you want to understand fees and pool share. You can explore staking only after you've checked what is being staked and how access works.
The important habit is to pause before each signature. Check the contract, the network, the amount, the slippage if you're swapping, and the approval if the wallet asks for one. Stablecoin swaps still need slippage review, even when the price looks calm, because execution is a function of the pool and the chain, not just the token label.
Journal every transaction
A simple log keeps the learning honest. Record the network, the amount, the fee, the approvals, the expected mechanism, the observed result, and one lesson you learned. Over time, that journal shows whether you understand the workflow or just got lucky on a few clicks.
That record also makes withdrawing part of the lesson instead of an afterthought. If you can enter and exit a small position cleanly, you've learned something useful. If you can't, don't size up.
Evaluate Yield Without Chasing APY
A high APY can help you compare options, but only after you know what is producing it. If you cannot explain the return source, the number is just a bright label on the interface.
Ask where the yield comes from
Higher rates often come from borrower demand, temporary incentives, token emissions, or a mix of those sources. Those are different engines. A return backed by real usage deserves a different level of trust than a return supported by a short-lived campaign.
Possible return source | Key review question |
|---|---|
Borrower demand | Who is paying, and why does that demand exist? |
Incentives | How long does the program last? |
Token emissions | What happens if the token reward slows down? |
Rewards or points programs | Is this real yield or a campaign with changing terms? |
Protocol fees | Can the protocol keep this going without constant promotion? |
The common mistake is chasing the largest number on the screen without checking liquidity and exit depth. If you cannot leave the position cleanly, the headline rate does not help much. If a position depends on a bridge, a chain, or a narrow contract path, that dependency belongs in your decision too.
A stablecoin vault with a modest return and a clear exit can be easier to use than a higher rate that depends on changing incentives. For a beginner, that tradeoff matters more than the size of the APY badge.
Compare outcomes, not only rates
A lower yield can be the better choice if the mechanics are clearer and the path out is easier. That matters for people who want stablecoin exposure without tracking every protocol update and every incentive change by hand. For users who want a guided workflow, Yield Seeker monitors and allocates across protocols on Base while keeping capital accessible, but reviewing return sources manually first still strengthens decision-making.
Practical filter: if you cannot explain the return in one plain sentence, you probably should not size into it yet.
The goal is not to reject yield. It is to judge whether the yield is durable, understandable, and worth the work required to manage it. Once you can compare return sources clearly, the APY number becomes a starting signal instead of the whole story.
Protect Capital and Limit Protocol Risk
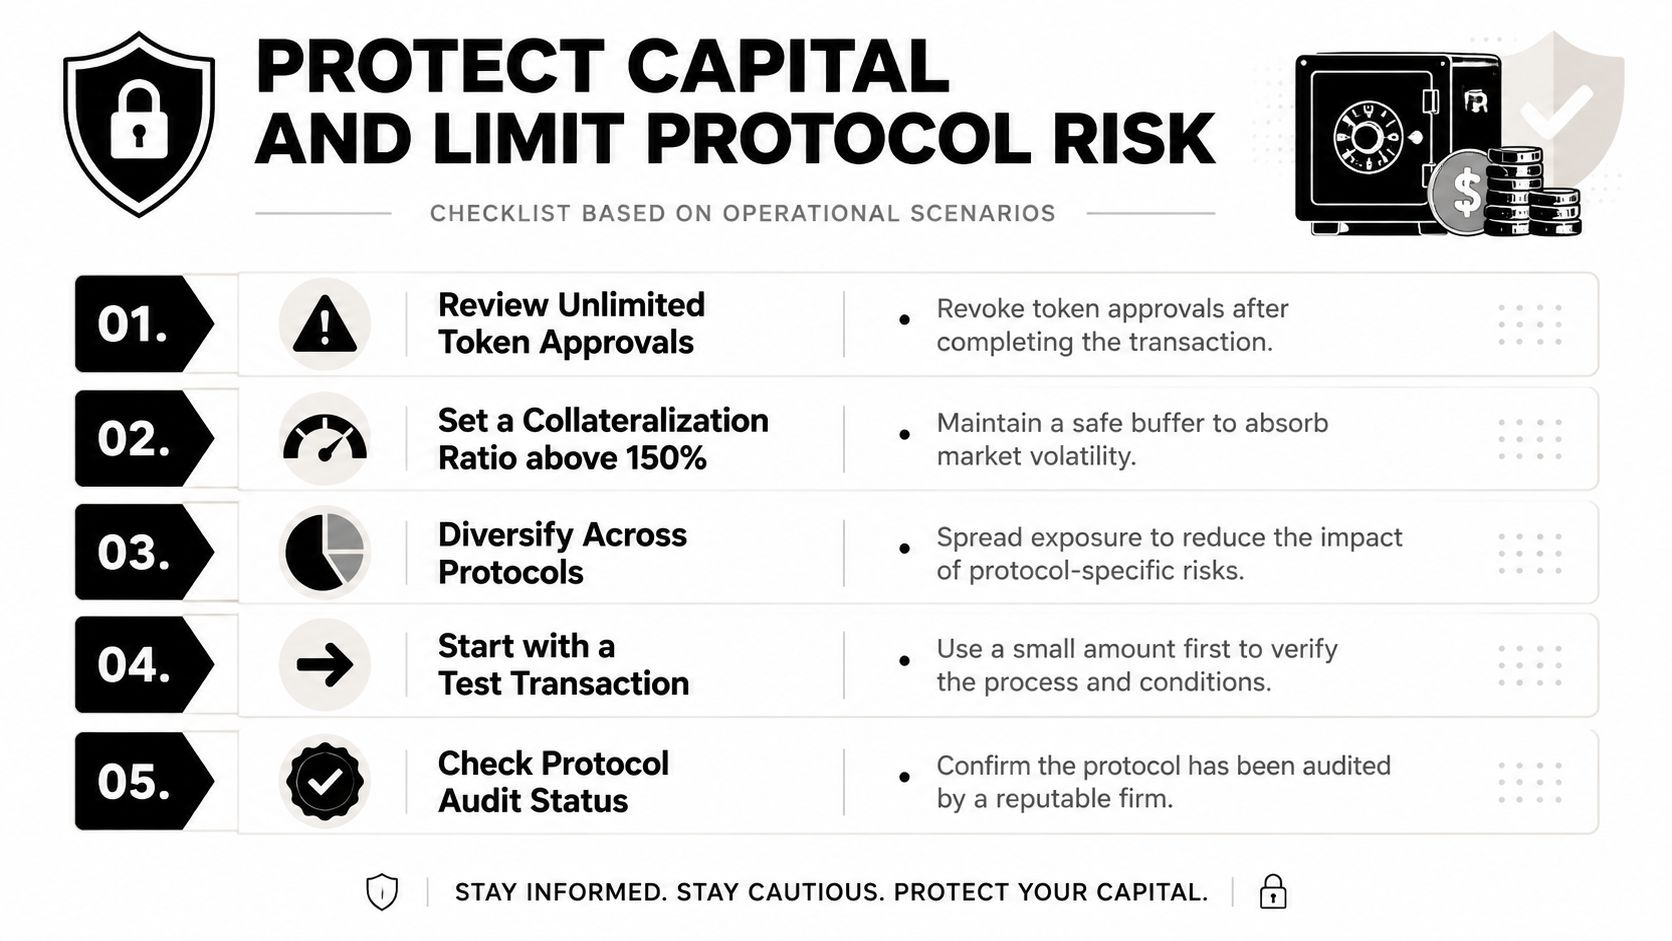
Risk controls are not a disclaimer at the end of the process. They're the process itself. A small mistake in DeFi can turn into a real loss fast, which is why learners should treat protection as a daily habit, not a theory chapter.
Stack your defenses
An unlimited token approval can leave more exposure than you intended, so use exact approvals where supported and revoke what you don't need after the action is complete. A bridge adds another dependency, so keep bridged amounts small while you're still learning. A bad slippage setting can turn a fair-looking swap into poor execution, so stay conservative on stablecoin trades.
Liquidation deserves special attention. If you borrow against collateral, keep enough room that normal movement doesn't force a bad outcome, and don't rely on memory to monitor it. Interface risk matters too, because a fake site can mimic a legitimate protocol well enough to catch a rushed user.
Respond calmly to failures
A failed transaction doesn't always mean something is wrong, and a suspicious one doesn't always mean funds are gone. Check the network, the explorer, the address, and the interface before you panic. If something looks off, disconnect the app, stop signing, and review the contract and the request again from a clean starting point.
The safest habit is to size each on-chain risk so it can't become a material loss to your finances. That's the rule I'd give any beginner. If the position would hurt too much to lose, it's too big for a learning trade.
Automate Carefully and Plan Next Steps
After a few manual labs, the next choice is not whether to keep learning. It is how much of the workflow you want to leave in your own hands and how much you want a tool to watch for you. The right split depends on your time, how much complexity you can tolerate, and how much control you want over each decision.
Use multiple sources, not one feed
A careful DeFi learner checks official docs, reputable courses, block explorers, and a few trusted communities. Relying on one thread or one influencer is where beginners often misread yield, risk, and access terms. DeFi education is still spread across blogs, courses, and hands-on practice, so your learning system should expect that spread rather than pretend it is not there (Decentralized Masters' beginner-to-expert roadmap).
A useful practice project is to review every approval in your wallet history and explain what each one allowed. Another is to compare two stablecoin paths without depositing, just by reading the docs and the dashboard. A third is to write out one full deposit-and-withdrawal workflow and keep it as your reference.
Treat automation as a control surface
Bots and AI agents can help with monitoring and allocation, but they should not replace your understanding of what they are doing. You still need to know whether the return comes from fees, incentives, or a temporary structure, and you still need to understand the exit. Automation should reduce repetitive tracking, not remove judgment.
Yield Seeker offers one path for this. Deposit as little as $10 USDC on Base, and an AI Agent monitors and reallocates capital across DeFi protocols while you keep access to the funds. The same risk questions from earlier sections still apply before you activate it. Check the source of yield, the exit path, and the approval size.
Pick your next milestone
Finish your wallet setup. Do one swap. Complete one lending test. Write down the result.
After that, decide whether you want to keep learning manually or use a guided AI workflow for stablecoin allocation. If you choose the manual path, go deeper into liquidation analysis, contract literacy, and governance research. If you choose the guided path, use the same risk questions and the same transaction journal before you move capital.
If you want a more guided way to apply these habits, visit Yield Seeker and compare how its Base-based stablecoin workflow, visual walkthroughs, and AI monitoring line up with the risk-first approach in this guide. It is built for people who want to learn DeFi with small, reversible steps while keeping capital accessible.