
Cashing out your DeFi gains isn't always as simple as hitting a single "withdraw" button. It’s a process. You need to track down all your positions, unwind them back into something like USDC, and then figure out how to get it back to your bank account.
This whole thing takes a few steps and a bit of planning, otherwise, you can easily get hit with nasty fees or even lose track of funds. For those who need constant access to their money, we've put together a deeper look into flexible DeFi withdrawals that covers more advanced strategies.
Your Pre-Withdrawal DeFi Checklist
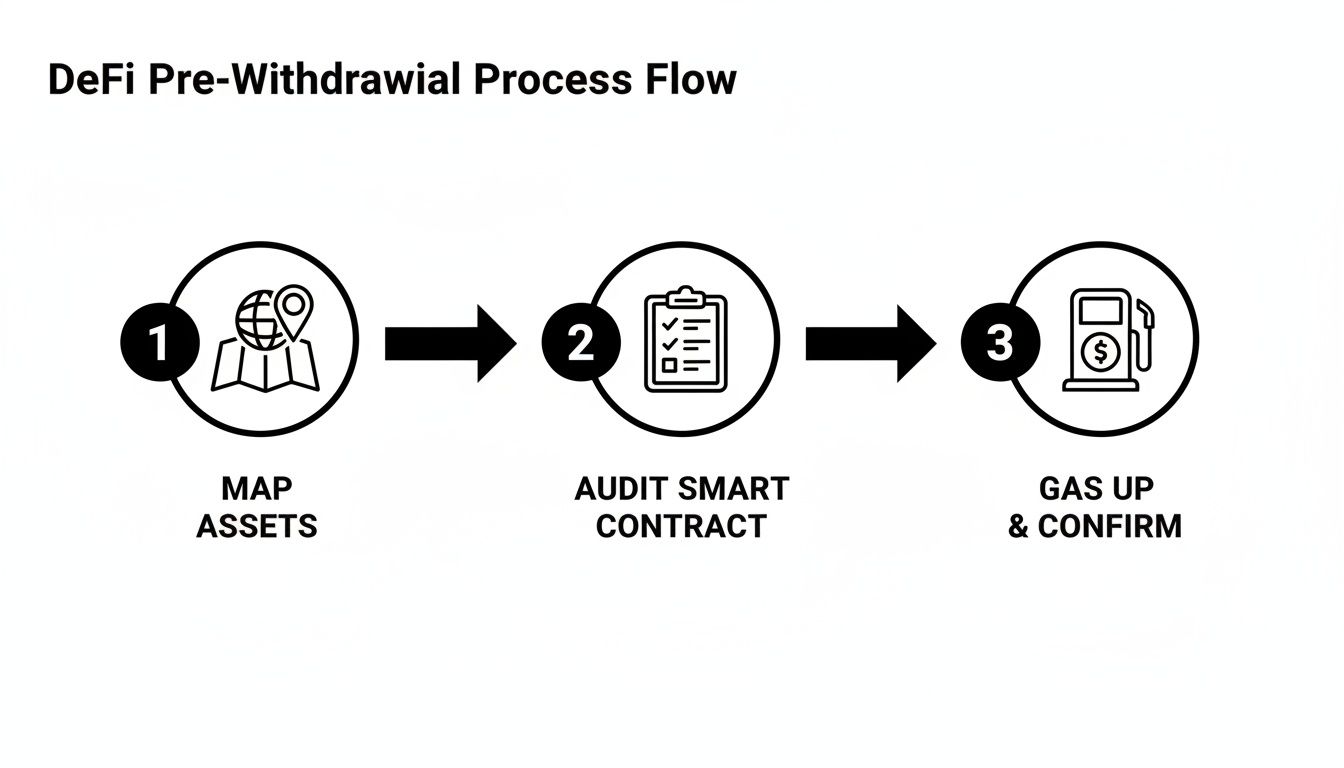
Before you even think about clicking withdraw, you need a game plan. This is probably the most important part. A little prep work upfront saves you a world of headache later.
Think of it as your pre-flight check. DeFi can be a messy space, and your capital is likely scattered across a few different protocols and maybe even multiple chains. The goal here is to map everything out so you don't leave any money on the table or get stuck halfway through.
First up, you need to hunt down every single one of your active positions. There’s no central dashboard in DeFi, so it’s on you to find where your funds are parked. A good portfolio tracker can help, but I always recommend doing a manual check just to be sure.
Identify Your Asset Types
Next, you've got to figure out exactly what kind of positions you're holding. Each one has its own special way of being unwound, so you can't just assume it's a simple "unstake."
Staked Tokens: These are usually the most straightforward. You’ve locked up a single token to earn rewards. The main thing to watch for here is a potential "unbonding period" where your funds might be locked for a few days after you unstake.
Liquidity Pool (LP) Shares: If you're providing liquidity, this is a two-step dance. First, you have to unstake your LP token from the farm. Second, you redeem that LP token to get back the two original assets you deposited into the pool.
Vaults: These are the automated strategies that do the work for you. Getting your funds out can be instant, but some protocols have specific withdrawal windows or fees, so it pays to check the docs.
One of the biggest mistakes I see people make is running out of gas money mid-withdrawal. If you're pulling funds from a complex vault on Base, for example, you might need to sign three or four separate transactions, and each one costs a little bit of ETH. Getting stuck without enough gas to finish the job is just plain frustrating.
Before you start, make sure you have enough of the network’s native token to cover all the transaction fees. That means ETH for Base, MATIC for Polygon, and so on.
As a rule of thumb, I always like to have at least $50 worth of the native gas token in my wallet before I begin any major withdrawal. This bit of prep work turns what could be a chaotic mess into a clean, predictable exit.
Unwinding Your Positions The Right Way
Okay, you've mapped out your assets and made sure your gas tank is full. Now it's time for the real work: unwinding everything. The goal here is to methodically turn all your different DeFi holdings back into one clean, simple token like USDC, getting you ready for the final off-ramp.
This is the part where a little prep work saves you a lot of headaches. A clear plan turns a potentially messy scramble into a smooth, step-by-step process.
Think of it like packing up after a long trip. You want to consolidate everything neatly before heading home, avoiding any last-minute surprises or forgotten items.
From Simple Unstaking to Complex LPs
My advice? Always start with the low-hanging fruit. That usually means your single-asset staking positions. Just head over to the protocol’s "Stake" or "Earn" page, find your position, and hit "Unstake." Your wallet will pop up asking for approval.
One thing to watch out for is an unbonding period. Some protocols make you wait a few days before your funds are actually back in your wallet, so don't be surprised if you can't move them immediately.
Getting out of liquidity pools (LPs) is a bit more involved and where I see people get tripped up the most. It’s a two-step dance:
Unstake the LP Token: First, you have to pull your LP token out of whatever farm or staking contract it's in. This stops it from earning rewards and gets it back into your wallet.
Remove Liquidity: With the LP token back in hand, go to the "Pool" or "Liquidity" section of the DEX. You’ll use that LP token to "redeem" or "remove" your liquidity, which splits it back into the two original assets you put in.
So, if you were in a USDC-ETH pool on a DEX on Base, you'd first unstake the LP token from the farm, then go remove liquidity to get your USDC and ETH back.
DeFi Position Types And Withdrawal Actions
Knowing what you actually hold is half the battle. To make it easier, I've put together this table that breaks down the common position types and what you need to do to start getting your money out.
Position Type | What It Is | Primary Withdrawal Action | Common Protocol Example |
|---|---|---|---|
Staked Token | A single asset locked to earn yield. | Unstake the token from the protocol. | Staking ETH on Lido |
LP Token | A token representing your share in a liquidity pool. | Unstake LP token, then remove liquidity from the pool. | Providing liquidity on Uniswap |
Vault Asset | Funds deposited in an automated yield strategy. | Initiate a withdrawal from the vault interface. | Depositing USDC in a Yearn Finance vault |
Hopefully, this table gives you a clear game plan for each type of investment you have, helping you unwind everything in an orderly fashion.
For anyone using a platform like Yield Seeker, this whole process is way simpler. Because your funds are never locked and there are no withdrawal fees, you get to skip all these unwinding steps. The platform handles the complex strategy management behind the scenes, so you can just withdraw your USDC directly whenever you want.
Consolidating Into One Stablecoin
After you’ve unwound all your positions, your wallet will probably look like a mixed bag of assets—some ETH for gas, maybe a few random governance tokens you earned, and USDC. The last move in this stage is to swap everything that isn't a stablecoin into your target token. For this guide, we're using USDC.
This step is all about efficiency. It's way cheaper and simpler to move a single, widely-used stablecoin like USDC across bridges or to an off-ramp than it is to juggle a bunch of different tokens.
Once all your capital is sitting in your wallet as USDC, you're officially prepped and ready for the next phase: getting your funds back to fiat or wherever they need to go.
Alright, so you've wrangled all your DeFi positions and now have a nice, clean pile of USDC. The next step is getting that money from where it is to where you need it, whether that's another blockchain or an exchange for cashing out to fiat. This is all about moving your funds smartly and safely.
Having all your capital in a liquid asset like USDC is a solid move. It cuts down the complexity massively. Instead of juggling a dozen different tokens across who-knows-how-many chains, you've got one asset ready to go.
This is where bridging comes into play. A bridge is just a tool that lets you send assets from one blockchain to another—think of it as a highway connecting different crypto ecosystems. For example, you might need to send your USDC from Base over to the Ethereum mainnet to use a specific off-ramp.

Choosing and Using a Secure Bridge
Now, listen up. Not all bridges are created equal, and this is where you need to be careful. Bridges have been some of the biggest targets for hacks in crypto history, and a bad one can mean your funds disappear into the void.
When you're picking a bridge, here’s what I look for:
Security and Reputation: Has the bridge been audited by reputable firms? Does it have a history of hacks? I always stick to the big, battle-tested names that the community and major protocols trust.
Fees and Speed: Shop around a bit. Bridge fees can be all over the place. Also, check the transfer time. Some are almost instant, while others can feel like they take forever.
Liquidity: Make sure the bridge actually has enough of your asset on the other side. If liquidity is low, your transaction could fail, or you could get a terrible rate.
Actually using the bridge is usually pretty simple. You’ll connect your wallet, pick your start and end chains, enter the asset (USDC in our case) and the amount, and then approve the transaction. Just make sure to double-check every single detail before you sign anything.
Here’s a pro-tip I swear by: always send a small test amount first. Yes, it costs a little extra in gas, but that peace of mind you get when you see the test funds arrive safely is priceless, especially when you're about to move a large sum.
When to Stay Put and Avoid Bridging
Sometimes, the smartest move is no move at all.
Before you even think about bridging, do this one simple check: does your favorite off-ramp exchange accept deposits directly from the chain you're on? For instance, if you have USDC on Base and your exchange (like Coinbase or Kraken) supports deposits from Base, you can skip the bridge to Ethereum entirely.
This simple check can save you a ton in gas fees and a whole lot of time and hassle. Too many people just assume they have to bridge back to Ethereum, but more and more Layer 2 networks like Base are getting direct support from the major players. If you're on a chain like Polygon, our guide on how to set up Polygon on MetaMask might come in handy for managing your assets there.
Navigating The Final Mile From Crypto To Cash
You’ve done the hard work—unwinding your DeFi positions and swapping everything into a clean stack of USDC. Now for the most satisfying part: turning those digital dollars into actual cash in your bank account.
This final leg of the journey is what we call the “off-ramp.” And honestly, choosing the right one is a big deal. It can make all the difference in fees, speed, and how much of a headache the process is.
Comparing Your Off-Ramp Options
The most common route, and the one most people are familiar with, is using a centralized exchange (CEX) like Coinbase or Kraken. It's pretty straightforward: you send your USDC from your wallet to your CEX deposit address, sell it for your local currency (like USD, EUR, or GBP), and hit withdraw to your bank.
Another popular method is peer-to-peer (P2P) trading. Some exchanges like Binance have P2P platforms built-in, but there are also dedicated services. These connect you directly with a buyer. You agree on a price, they send you the cash, and once you confirm it’s in your account, the crypto is released to them from an escrow.
Finally, you've got crypto debit cards. These let you top up a card balance with your crypto, which then gets converted to fiat whenever you make a purchase. They're handy for day-to-day spending but usually have lower limits and aren't great for cashing out large amounts.
For the vast majority of people, especially if you're dealing with a significant amount of money, a trusted centralized exchange is the way to go. It offers the best mix of security, deep liquidity, and regulatory compliance. Plus, it gives you a clean paper trail, which is a lifesaver come tax time.
Choosing The Best Off-Ramp For You
When you're ready to cash out, knowing the landscape of available exchanges is crucial. For instance, if you're based in South Africa, you'd want to look up guides on local South Africa Cryptocurrency Exchange Platforms to find one that best suits your needs.
Here’s a quick checklist I run through when deciding on an off-ramp:
Fees: How much are they going to charge you to sell the crypto and withdraw the fiat? You need to look at both the trading fees and the bank withdrawal charges.
Speed: How long does a bank transfer take? It used to be a multi-day wait, but many exchanges now offer instant withdrawals for a small fee, which is a massive improvement.
Limits: What are the daily or monthly withdrawal limits? Make sure the exchange can handle the amount you want to cash out without forcing you to do it in tiny increments.
KYC Requirements: What level of identity verification do they need? It's always a good idea to have your documents ready to go to avoid any frustrating delays.
A Real-World Off-Ramp Example
Let’s walk through the most common scenario I see: sending USDC from Base to a CEX.
First, you'll log in to your exchange and find your USDC deposit address. This is critical: make sure you select the Base network. Copy that address.
Next, from your MetaMask or whatever wallet you use, initiate a transfer. I always, always send a small test amount first—like $5 or $10—just to be sure everything is working correctly. Once that small amount arrives safely, you can send the rest.
After your USDC lands in your exchange account, you just need to execute a sell order for your local fiat currency. The final step is to go to the withdrawal section, pick your linked bank account, and start the transfer. This is the moment your DeFi gains become real, spendable cash.
Avoiding The Scams and Pitfalls When You Cash Out
Getting your money out of DeFi is the final, and most critical, step. It’s also where you need to be the most paranoid. This is exactly when scammers and hackers love to strike, preying on people when their assets are on the move. One little mistake here can wipe out all the yield you’ve worked so hard to earn.
One of the most classic and dangerous threats is the phishing scam. These are cleverly faked websites designed to look exactly like the real DeFi protocols or exchanges you use every day. A scammer might send you a link from a fake social media account or pose as a "support" admin in Discord, guiding you to a site that’s a perfect clone of the real thing. The moment you connect your wallet and sign what you think is a normal transaction, they drain your funds.
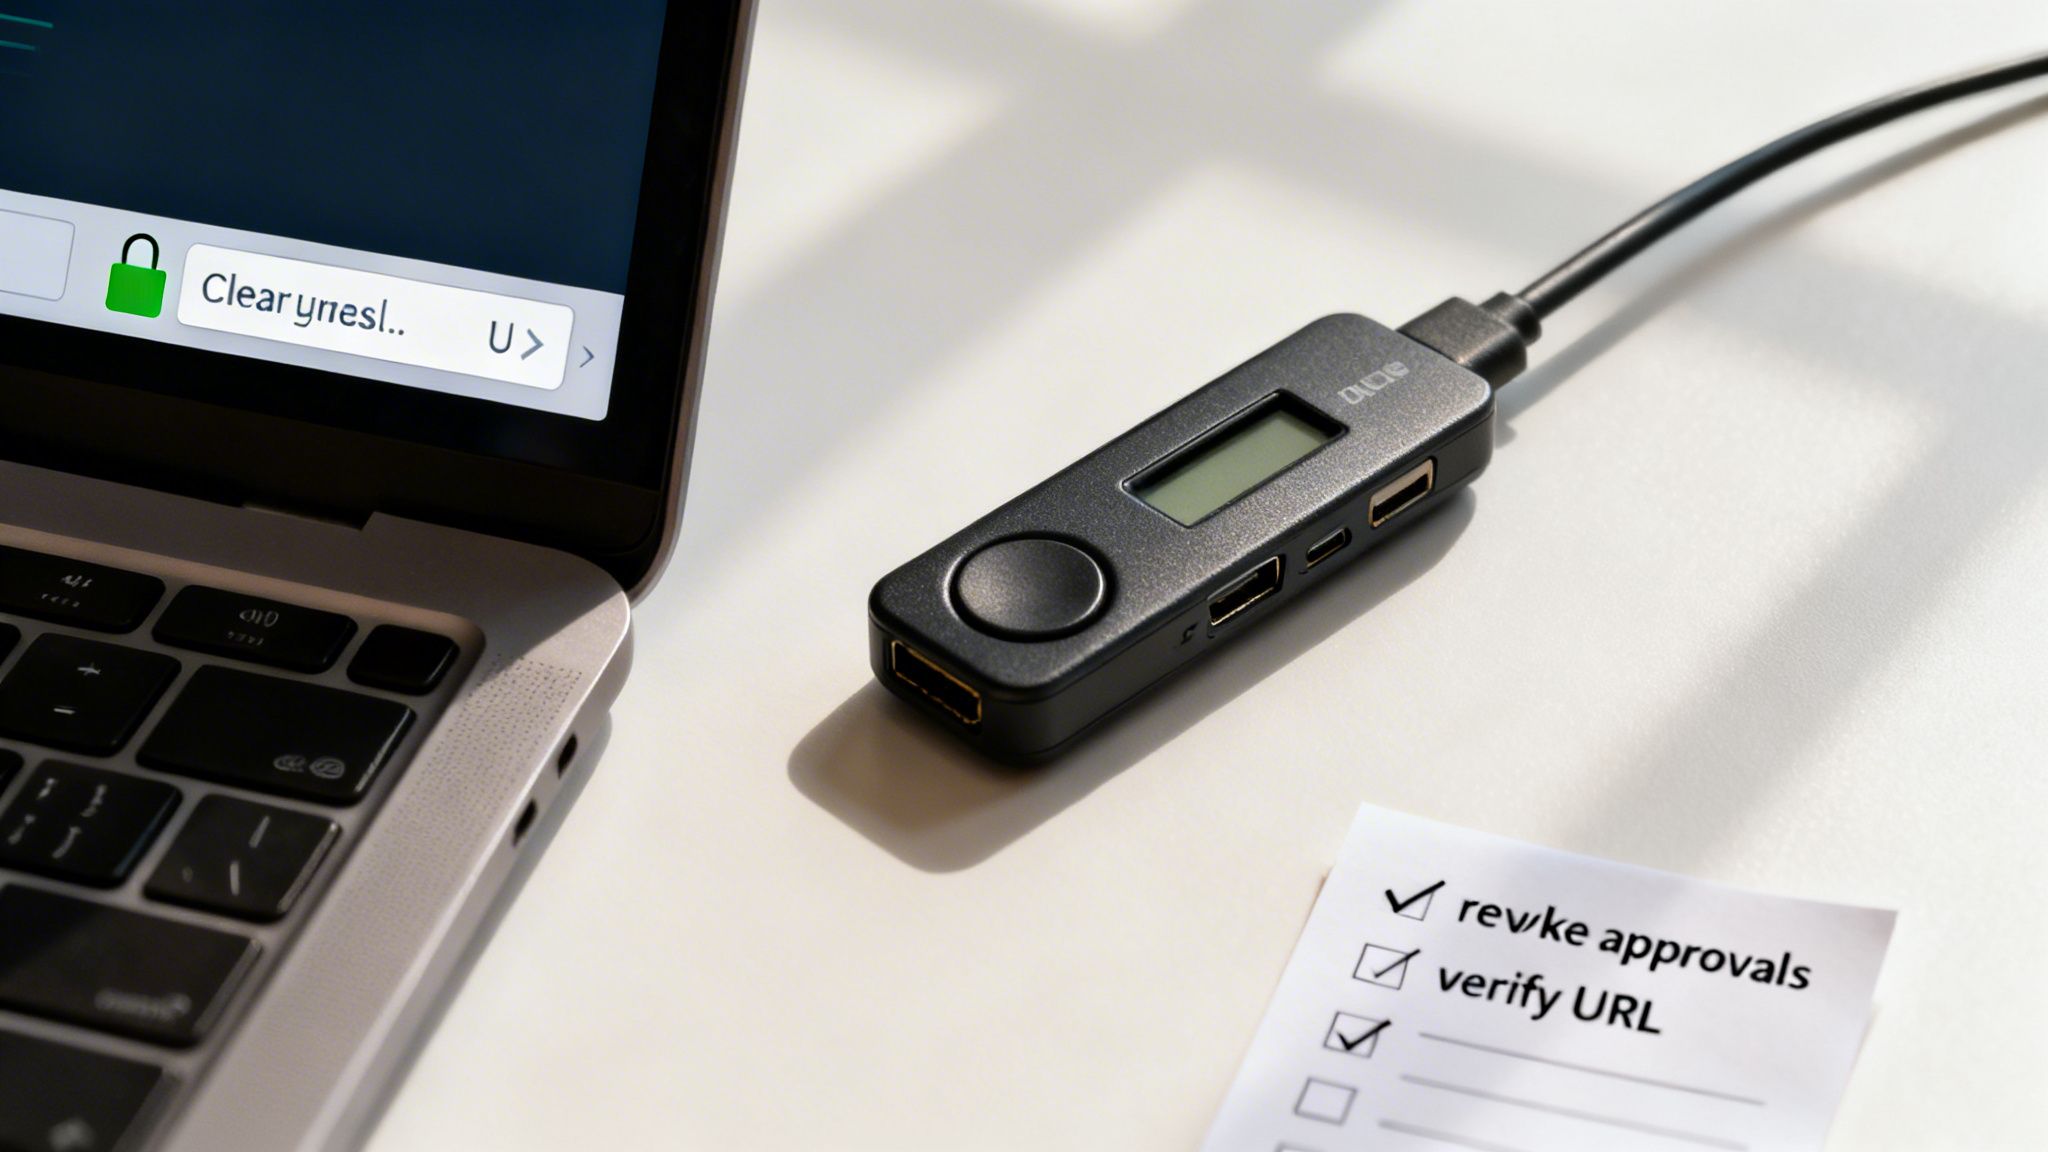
I can't stress this enough: always triple-check the URL before connecting your wallet. The best habit you can build is to bookmark the DeFi sites you use regularly and only access them through those bookmarks. Never, ever click on unsolicited links or trust DMs from strangers offering to help you out.
Those Pesky Contract Approvals
Another huge risk is accidentally approving a malicious smart contract. Think about it—every time you use a new protocol, your wallet pops up and asks for permission to let that protocol's smart contract interact with your tokens. If you unknowingly approve a malicious contract, you've just handed over the keys to your funds for that specific token.
This isn't just a theoretical threat. In the first three months of 2026 alone, the DeFi space has already seen at least 15 major security incidents. These have resulted in staggering losses of over $137 million, with only a measly $9 million or so recovered. Many of these exploits, as you can see in this breakdown of recent DeFi exploits, happen because attackers abuse permissions that users have already granted.
To stay safe, you need to make these security habits second nature:
Get a Hardware Wallet: This is non-negotiable. A hardware wallet forces you to physically press a button to sign any transaction. This simple step provides a massive layer of defense, making it almost impossible for a hacker to drain your funds remotely without you physically confirming it.
Revoke Old Approvals: Make it a regular habit to use a token approval checker. These tools scan your wallet and show you every permission you've ever granted. Go through the list and revoke any old or unnecessary approvals. Think of it as changing the locks on your digital house.
Lock Down Your Identity: Your crypto security is tied to your overall digital security. Understanding how to do things like safely bypassing SMS verification can be a game-changer. It helps reduce your exposure to SIM-swap attacks, a disturbingly common way for attackers to compromise accounts linked to your phone number.
Treating these practices as essential is the only way to withdraw your funds from DeFi with peace of mind. For a deeper dive into more defensive strategies, be sure to check out our complete guide on how to keep your crypto safe from the most common threats. At the end of the day, your security is your own responsibility.
Even a well-planned withdrawal can hit a few bumps. Let's go over some of the most common questions and sticking points that pop up when you're pulling funds out of DeFi, so you can handle the final steps like a pro.
How Much Should I Budget for Gas?
Gas fees are a fact of life on-chain, and they’re always fluctuating based on how busy the network is. Before you even start the withdrawal process, it’s a good habit to check a real-time gas tracker for whatever network you’re using, like Base.
As a personal rule of thumb, I always keep at least $50-$100 of the network's native token (like ETH for Base) in my wallet. This buffer is a lifesaver. It covers the multiple approvals you’ll need for more complex withdrawals and saves you from a headache if a transaction fails, which still eats up some gas.
What's Slippage and How Do I Deal With It?
Slippage is that annoying difference between the swap price you see and the price you actually get. It happens most often with low-liquidity tokens or when the market is going wild.
To keep it to a minimum, here are a few tricks I use:
Trade when things are quiet. I try to avoid peak US or European market hours when volatility is highest.
Break it down. Instead of one massive trade, I split it into several smaller ones to lessen the price impact.
Use a DEX aggregator. These tools are great because they hunt for the best price across multiple liquidity sources for you.
When you're just swapping from one stablecoin to another, setting your slippage tolerance to 0.5% or lower is usually a safe bet.
The fact that we even have to worry about things like slippage shows how high the stakes can be in DeFi. While user growth shot up to over 7.5 million unique wallets back in late 2021, the combination of hacks and sheer complexity led to a big drop-off. Fast-forward to 2026, and even with fewer active users, persistent smart contract flaws resulted in $137 million stolen in just 15 exploits. A staggering 93% of those funds were never seen again. This data, which you can dig into in this DeFi user trends analysis, really drives home why you need to be careful with every single step.
Are My DeFi Withdrawals Taxable?
This isn't formal tax advice, but you absolutely need to know that many steps in a standard DeFi withdrawal can be a taxable event depending on where you live.
Typically, both swapping one crypto for another (like ETH for USDC) and selling your crypto for fiat cash are considered taxable transactions. It's so important to talk to a qualified tax professional in your area and get set up with some good crypto tax software to keep everything straight.
What if My Transaction Gets Stuck or Fails?
First off, don't panic. This happens to everyone. The very first thing to do is grab the transaction hash and pop it into a block explorer to see what’s going on.
If it's just stuck "pending," it's probably because the gas fee was too low. Most wallets have a "speed up" button that lets you resubmit it with a bit more gas to push it through. If it failed, the block explorer will usually give you a reason, like "out of gas." A failed transaction isn't the end of the world—you only lose the gas fee you paid, and your actual assets are still safe in your wallet.
At Yield Seeker, we built our platform to get rid of many of these headaches. Our AI-powered agent handles all the complex yield strategies for you, so you can withdraw your USDC directly. That means no more tricky unwinding steps, no surprise fees, and no lockup periods. Start earning smarter yield today.